Wednesday, November 25, 2009

Holiday Gift Class: Glittery Christmas Balls


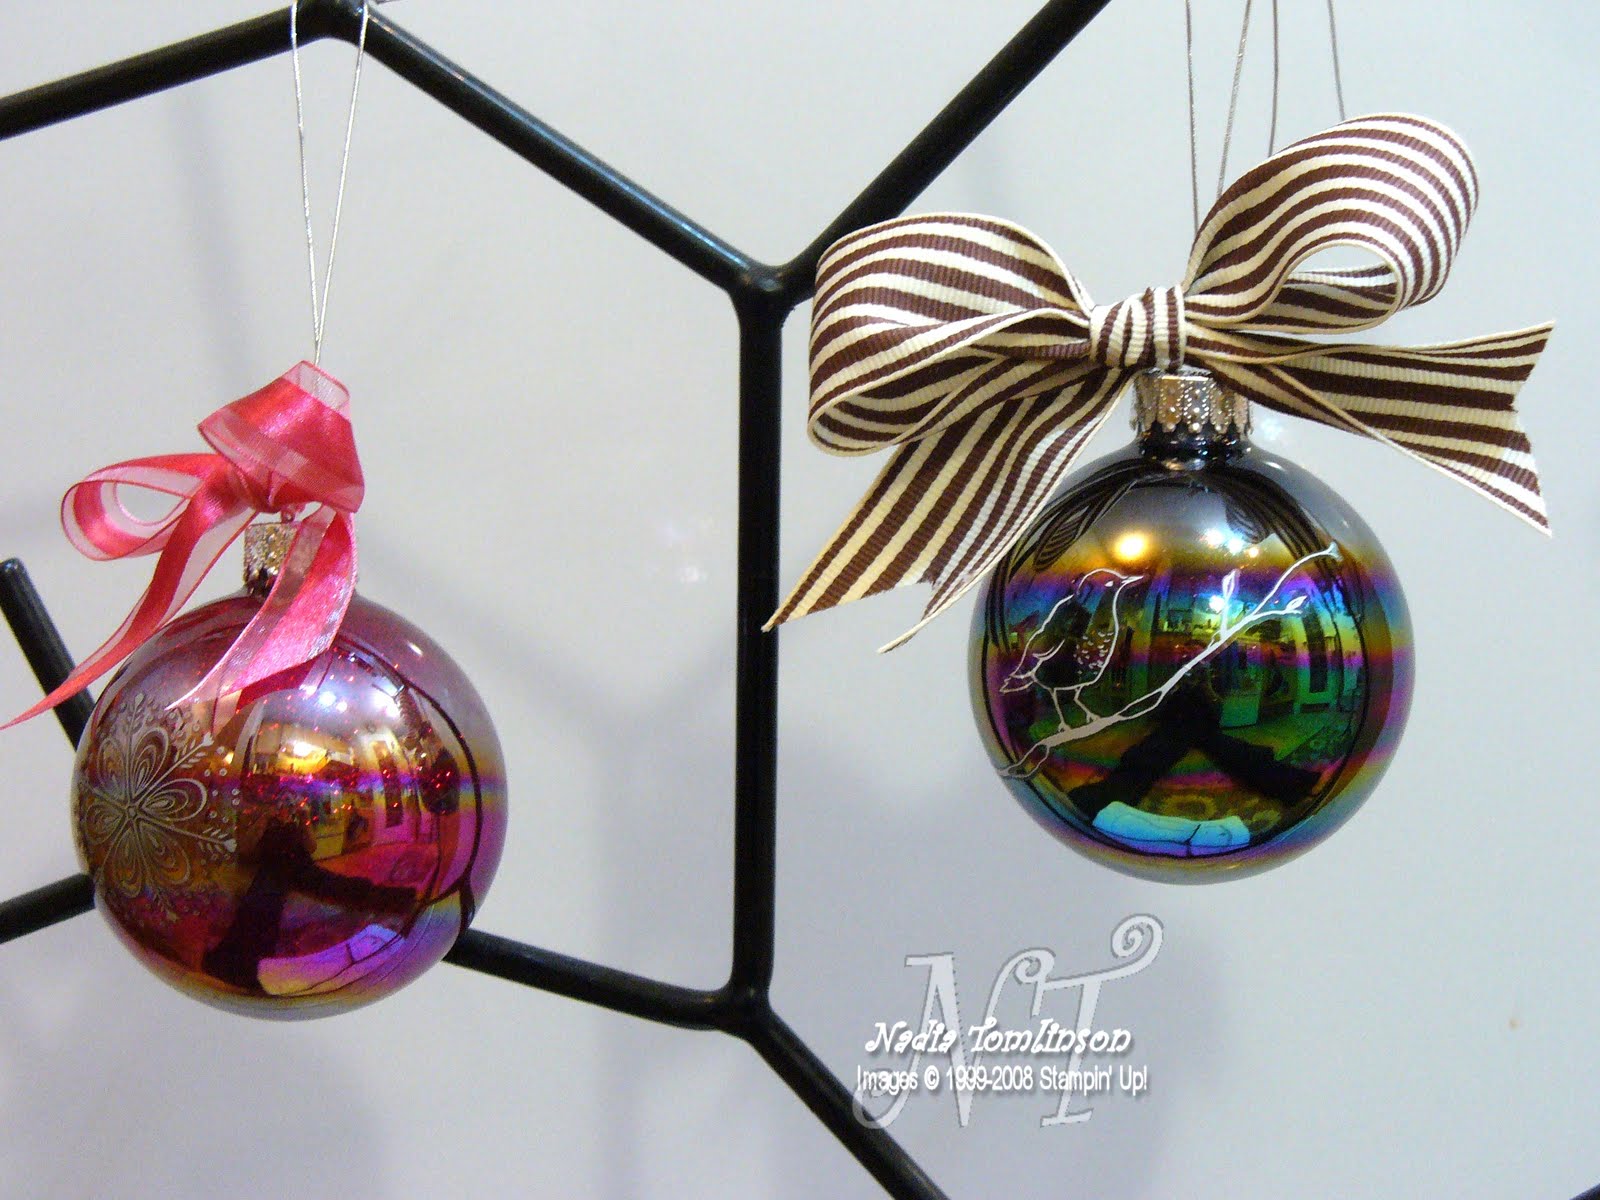
Last year I made beautiful glittery glass Christmas balls to give to friend and family, I was amazed that something so quickly and easily made could look so fabulous! The ornaments were really well received and I decided that I should share the joy of making and gifting them with my stampers. So I will be offering a special class on Thursday Dec. 10th @ 7pm where I will show you how to create a set of 6 of these beauties!

The cost will be $20 ($15 for VIPs) and will include the supplies to create 6 glitter ornaments and a full sheet of holiday rubons. These ornaments are beautiful enough to give individually to teachers, neighbours and friends or as a set for a special someone on your list

To register for the class please contact me ASAP as spaces will be very limited. All those who register with me by this Sunday, Nov. 29th will be able to create a bonus ornament gift box! Contact me soon to reserve your spot.

Tuesday, November 17, 2009

Wow Time Flies!

I knew it had been a little while since I last posted but, a month??? What on earth happened? I know you can't possibly know but the odd things is that I really don't either. They say that as you get older time passes faster and faster I really hope it slows down a little though because at this pace I'll blink and my kids will be grown!

I think I can guess one culprit to this last month going by so fast, if you take a quick look around at my blog you might also guess...My Digital Studio. Love it! Love it! Love it!! I can get awesome scrapbook pages done without turning my house upside down and it makes great posters/banners/backgrounds....really with a little tinkering the sky is the limit.

As for the new blog look what do you think? Both the background and the header were done with MDS. My mom is a huge fan of the artist Mary Engelbreit and loaned me a gorgeous book about her, I couldn't resist trying to reproduce her aesthetic on the blog. It's so cheerful and vibrant!

While I am going on about what you can do in MDS I might as well share a few of my recent scrapbook pages with you. Make sure to click on the images to see them larger, there are a lot of little details!

These first 2 pages were made to be name frames for my kid's rooms, I can't wait to get them printed! It was so much fun to use the included Simply Scrappin' Kits to make pages that reflected so well their personalities!


For this page I used a photo layout that is included in the program, it was super quick to do.
These last 2 pages are for the baby book I am working on for my son. Thanks to MDS it finally seems like an achievable project! {hint= black and white always looks classy and is a great way to deal with tacky or unpleasantly coloured scenes, like here at a hospital}


And finally, this is the front of the card I created and had printed to get My Digital Studio Certified. This card was almost effortless as, I took a premade one from the Hoppy memories kit and tweaked it to fit Kaleb's photo and a greeting. I am really happy I had a few of these printed, because it seemed kind of costly to have them professionally printed, but -WOW- they look great and are full colour inside and out! Hopefully tomorrow I can show you a photo of the printed cards as well as a peak at what I did inside!

Tuesday, October 13, 2009

Friday, October 9, 2009

A Sketch challenge for you!

I have always wanted to offer sketch and colour challenges on my blog but I just did not have an easy way to do them. Thanks to My Digital Studio though, it is now a piece of cake!! I have no idea how often I will be able to offer these challenges but, here's your first one:


No rules, have fun! If you do give my sketch a try send me a link to it with your comments. If you want to post to SCS put SWS#1 in your description and don't forget to send me a link, I'd love to see your creations!

I will post my card for this challenge {hopefully!} later today when I announce a very special upcoming event, so keep your eyes pealed!

Happy Stampin'!

Tuesday, October 6, 2009

Another Monster Post!

Hmm... I wonder if one day I can get it together enough to be able to do small daily posts instead of sporadic monster posts... Well, not today! Here's your weekly-ish monster post:

-Please forgive the photo quality,it's all I can do to snap a quick pic of my projects as they head out the door these days!

Today's first project was made for a dear little friend of mine who turned 1 in August.
I really enjoyed making this card, the stamp set used is called...(searching for my catty because I ordered the French set called "petit amours") Love Bug. It's a level one hostess set too, so I earned it free {yay!}. This is a pretty simple project, the # 1 is made with our chunky glitter and sticky letters (a perfect pairing!) The polka dot DSP was made using punched circles and the only other thing you might not be able to pick out in the photo is that I covered the bugs in crystal effects so they almost look like little plastic toys.

The following project is the gift that accompanied my buggy card. As you can tell it's another take on a framed scrap book page (of course this one won't fit in any album I know).


This was a wonderful project to showcase the beautiful Kaleidoscope DSP that came out in our most recent catalogue. It is so beautiful that it really stands alone and did not need much added to it. In fact I have barely broken into this paper pack because I can't bare cutting the sheets!

Next is a fun birthday card using Beary Best Friends from the new Build-A-Bear line. While this collection is generally targeted at kids, this card was made for a 31st b-day of a friend who is still young at heart. I decided to do something really cutesy/girly to celebrate not only her Bday but also the fact that she is soon going to have a little girl after 3 boys!

There is lots of detail on this card, paper piecing, glammed glitter shoes and crystal effects of course on the balloon. I absolutely love my SU! Top Note die, I think it is my single best Big Shot die purchase, hands down. I love how it makes a perfect canvas to highlight any stamped image.

My next 2 cards feature the Lots of Bots stamp set. This is a really fun set to work with and excellent if your circle of friends includes SciFi nuts or simply quirky fun folk. Please forgive the photo quality of the first card, believe me it's much better in real life!

I never would have thought that of all the current In Colors I would gravitate towards Mellon Mambo, I'm not a pink person I swear! But somehow it keeps creeping into my projects. The above card was actually made for my brother, so I did not start out the project with pink in mind, but, the MM seemed to give it just the right {pop!}

This next robot card was made for a woman so I did really go for the pink & bling. The robot makes me laugh because I think I might have gotten a little carried away with my paper piecing. I think he's got to be a thrift store shopper because you know those floral pants have to be vintage polyester! The background for this card was surprisingly easy to do with a brayer, some sponges and glossy cardstock. I am hoping to do a class on brayered backgrounds sometime before Christmas. But if you can't wait to try it out you must check out Michelle Zindorf's blog. She has pioneered this technique in card making and her cards are absolute works of art (plus she posts some really simple to follow tutorials regularly!). Oh, I almost forgot to mentions that I covered the robot, planet and comet with the Champagne Mist Shimmer Paint from the Holiday mini catalogue. It's really great stuff and gives your projects a fabulous but subtle, well... Shimmer!

And one final card for today. This one was made for my nephew's dedication. I wasn't sure what to do for him because I had used all of my classic 'baby boy' type stamps on past projects for him and wanted to try something different.
I used the stamp set Good Friend which I am almost ashamed to say that despite buying it right away when it came out and even mounting it immediately when I received it, this is the first time it has seen ink!! I really love the bird and the funky retro shapes that come with it so I'm thinking that though this has been it's first inking, it will definitely not be the last. After stamping the shapes on the background I felt the card was still missing something so I embossed the new wood grain background stamp in clear EP on the kraft and I love how it turned out!

Happy Stampin'!

Monday, September 21, 2009

Last Minute Stampin' Class Alert!


By the way this class announcement was made with My Digital Studio (Available Oct 1st). Loving it!!!

Wednesday, September 9, 2009

Back, finally!!

All right, I'm back and hopefully ready to roll! I had a CRANKY teether for about a month so I got very little done...you should have seen my house, ACK!!! (actually it's better you didn't!). I am so excited because, the little brown truck stopped and dropped off my new Stampin' Up! goodies a day early and this package contains the all new My Digital Studio!!! I wanted to jump right into it the moment I had the chance, but I've decided to be a good little blogger and post something for you first. I know, I'm sweet! {goofy grin} I have been creating up a storm over the last couple of weeks to try and catch up from the recent stamping hiatus.

Here are a few of my creations. (I won't have the time to put recipes up for these but if you have any questions please don't hesitate to post me a question)
This first image is of the scrapbook frame I made for my brother's birthday. I love making these frames I think it's a great way to capture a special moment and share it with someone who doesn't scrapbook themselves. I did use retired colours on this page but, felt there was no better colour than Kiwi Kiss to capture my brother's wacky, vibrant personality. What do you think of the frame? I thought it was funky but, apparently not everyone agrees because the whole line was being cleared out dirt cheap at local craft retailer!! Oh, in case you don't understand French the journaling simply says Gabby and Uncle Alex...I'm sure you guessed.

Next up is a very simple thank you card I made for my recent Stampin' VIPs, I really like this colour combo and loooooove the fact that we have the in-colours in marker form now!! Hmm, I wonder what the chances would be of SU! coming up with a 'Retro' marker pack with all the past (or at least best of) in colours? Bands do comebacks all the time why not colours eh?

This next card is a Birthday card for someone special. I finaly inked up my Jardin Botanique set, which was on my must haves list the moment I saw it. I did a few different things on this card, the ribbon is actually our white satin ribbon coloured with a Sahara sand marker, it really changes the feel of the ribbon. It makes it much less "bridal". The second thing I did was use some of my Very Vanilla Hodge Podge hardware (I tend to hoard these!). Before attaching the hardware piece I antiqued it a bit by covering it with choc. chip craft ink then buffing it off with a tissue. The elegant eggplant rickrack is found in one of our current Ribbon Originals packs, for some reason I LOVE rickrack...a touch of whimsy perhaps?
Ok now this card was a real stretch for me but I think I like the end result. My SUO bloggers group, the design divas challenged us to use buttons on a project and this is my attempt. This card is actually going to be the 'WOW' card we will be making at my October workshops. (have you booked one yet?) The biggest step out of my comfort zone on this card was to use Crushed Curry cardstock...I really hated this colour....I'm still not luvin' it but, now I see that it really gives great punch in the right combinations. The ribbon is actually our organza ribbon (white again) coloured with pumpkin pie ink and then scorched with a heat gun. Be very careful if you do this at home. It doesn't take much to have a melted mess!

My final project was a gift for my daughter's new Preschool teacher. I am going to have to search through my blog subscriptions to find out who first posted this cute project. I had originally wanted to make one of those adorable paper schoolbags with a coordinating stationary set but, I had to find something less ambitious and this hit the spot. The basic pencil shape was made by adhering a Hershey's kiss (or Hug in this case) to the end of a pack of Rolos using mini glue dots. The first pencil I made I just wrapped in the summer sun cardstock but, it seemed to be missing something so, I made another one which I scored lines on using my bone folder and paper cutter, I think it made all the difference. Two other things that I did to add realism were to add a punched pink circle with a heart stamped on it to the eraser end and to scallop the writing end with my square scallop punch. Then of course I had to eat the first one to hide the evidence {grin}. Here's the pencil:
here it is in her schoolbag:
and here is my little school girl:

and since his sister can't steal the whole spotlight, here is a recent pic of the little teether himself, Kaleb:
Well I'm off to play with My Digital Studio!! (the kids can feed themselves right?)
Thanks for stopping by and Happy Stampin'!!

Monday, August 17, 2009

teething hiatus...

Hi all, I am really hoping to be able to post something soon, Kaleb has been in what looks like full on teething for nearly a month now. He is normally a fairly happy, easy going baby, but I am gathering he does not have a very high pain tollerance. At the moment conscious=CRANKY! And what worked with his sis is not working with him, so if you have any teething tips I'm all ears!!
Happy Stampin'!
-Nadia

Saturday, July 25, 2009

A challenge!

I have joined a group of fabulous blogging paper-crafters. Our goal is to motivate and inspire each other to keep creating and blogging! I rarely have problems with the creating side of things but I seem to struggle with some sort of pre-posting anxiety which makes posting often fall to the very bottom of my to do list, even though I really do love to share my projects. (especially when I get all of you lovely and encouraging comments!!) Hopefully my new crafty friends will encourage me to push past my posting dread and you will hear from me a little more regularly. (You can see their great blogs on my side bar under My SU! Blog List)


One thing our (soon to be named) group has started are weekly challenges. This week our challenge was to create a simple card; sticking to the basics of ink and cardstock and it had to be made in under 15 min. For me this is the very definition of challenge! I always overcomplicate my projects and they generally take me a lot longer than 15 min to make!


I have been wanting to play around with my new movers and shapers die ( the one that looks kind of weird and useless in the catalogue but is really fabulous!) So this is the card I came up with: (Sorry the first pic is over exposed, I edited it on a very dim monitor and did not realize how bright I made it)


{Recipe}


Stamps:
Circle Circus, Thoughts and Wishes (hostess level 2)

Paper:
Soft Suede, Crushed Curry, Mellon Mambo, Whisper White

Ink:
Same as paper + Dusty Durango & Old olive markers

Tools & Acc:
Movers & shapers curly lable & modern label dies, modern label punch.


I coloured the flower in with markers directly to the rubber. I started with the lightest colour (crushed curry>dusty durango>mellon mambo) then moving darker and finally just before I stamped it I sprayed my stamp with a very fine mist of water so that the inks would blend.


Oh and for an example of my posting procrastination, I made the card Monday, edited the images Wednesday and I am finally posting today literally just hours before our challenge cut off!! {sigh} I'll do better next week!


While I am posting I have one more card to share with you. This is one of the cards I created for my next techniques class. I was going to hold it in August but with so many people on holidays I think I will hold off until september. I used the ever popular water colour roses or re-inker spread technique on this card with our new in colours Mellon Mambo and Rich Razzleberry. This technique is so much fun and deceptively easy to do. If you haven't tried it out yet and are in the Edmonton area, plan to come to my class, you'll love this technique, I promiss!


{Recipe}


Stamps:
5th Avenue Floral

Paper:
Soft Suede, Rich Razzleberry, Mellon Mambo, Whisper White, Shimmery White

Ink:
Same as paper + crushed curry marker & Versamark

Tools & Acc:
Top Note die, ticket corner punch, soft sued polkadot gg ribon, white EP, aquapainter, Texturz plates.


I hope you enjoyed my creations this week, thanks for stopping by.

Happy Stampin'!


Thursday, July 16, 2009

Experiencing Technical Difficulties!

Apparently my laptop (2 yrs old) and camera (3 yrs old) and our home network (items ranging from 1-12 yrs old) are hideously out-dated and are doomed for retirement! I must be a little out of touch because, I am still under the impression that if you pay hundreds and even thousands of dollars for a piece of equipment it ought to last more than 2-3yrs!! My husband, who is very tech savvy, assures me that in the world of computers this is a very acceptable life span. On the one hand I think that this is terribly unreasonable and I don't want to put another dime towards computers etc. but, on the other hand I just don't know what I would do without internet access, a computer that I can take with me and a digital camera! Weird how you can go from not even knowing something exists to not being able to live without it in a matter of years!


Ok, enough philosophising, Let's see if I will at last succeed at posting some new creations. I hope to post as many as I can while the gettin' is good"!! Once again I won't take the time to list the recipes but, if you want to know about something from any of these projects just leave a comment and I would be happy to fill in the blanks!

This is the first card I made using my new catalogue goodies and 2009 In-colors. The stamp is
one of the level 2 hostess sets in the new catalogue (Wings of Friendship). I really love all the hostess sets this time (especially the ones coming in the Holiday Mini Catalogue this September! {sshhhhh..})


AAAck! I can't believe it, I just dropped my laptop!! It literally slid right off my lap onto the floor and I could not stop it! Thank goodness it's still sort of working...in case you haven't guessed yet I am a bit of a klutz! Do you think Fisher Price is likely to start making electronics??


Ok back to the cards! I'm using 4 of the new in-colours: Rich Razzleberry, Mellon Mambo, Bermuda Bay and Soft Suede oh, make that 5 there is a teeny tiny bit of Crushed Curry on the bird. Thanks to SU!'s offering in-colour markers this year, I was able to colour directly on the stamp to get a multicoloured image. I really did not know how to use the in-colours at first they are really rich and beautiful but, also kind of intense and intimidating. What I discovered is that the colour soft suede goes really well with any of them and sort of grounds them. I love this colour, it's a great neutral and sort of reminds me of my favorite cargo pants from high school, they went with everything!


There is a lot of distressing on this card some sponging and some direct to paper ink application. The only other particular thing on this card worth noting is the corduroy button. Nope! they did not come out with them in Bermuda Bay, I just took a Kraft one and coloured it with my marker, super easy!! You can also smoosh the buttons directly into the ink pad, this should work with any darker colours.


These Next two cards make me want to laugh...or cry! Neither of them got out to their intended recipients thanks to my 3yo DD. I actually just found them a couple days ago behind our sofa when I was tearing the house apart in search for my lost wallet. The first card is a little girl dress I created based on Lauren Meader's onesie cards. I simply cut a straight line from the under arm to the bottom of the card then lightly rounded the bottom using my circle cutter. The pinafore was made of vellum that had been embossed with our polka dot BG stamp in white. The flower on the waistband was created using the Sizzix Bigz Daisy 2 die. This card was intended for the christening of a friends daughter. I wanted something really girly but not pink!


This card also did not make it out. It is one of the cards I created for Mother's day though it is my least favourite of them. ({sigh} the pics of the other ones got lost one of the times my camera decided to have a moment). I used the Reinker Spread, or Watercolour roses technique that I believe was shown at a SU! Regional meeting then spread like wild fire across the stamping world. The end result is so stunning that you wouldn't guess how fun and easy the technique is! Take a peak at a great tutorial here on Patty Bennett'ns Blog. The reason I am not as fond of this card as the others is that I dropped an ink pad on the card while I was making it so I was forced to change my design on the fly. The other ones don't have the lily, the leaves are placed differently and I have a die cut butterfly...hmm I will have to ask my mom to bring her card so I can take a pic to share.


Speaking of my Mom it was her birthday recently so I made this next card. I really had fun making this one, my mom is a fan of anything Mary Engelbrite (sp?) so I took that as my launching point. She also loves scotties since she had one when before I came along. The pedestal that the dog is on was from the Crazy for Cupcakes set. I was inspired by another stamper (which I can't recall at the moment) who had stamped animals from the Wild About You set on the same pedestal. The paper is the now retired Rockabilly Specialty paper, boy I wish I had gotten it earlier, I LOVE it!


Here's a peak at the inside:


And this framed scrapbook page was part of her gift. It did not turn out quite as I had planned but looks much better in real life than in this pic. The page is in honour of my mom's father a Québec fiddle player, who passed away this fall in his nineties. The moment I saw this violin stamp in the catalogue I knew I had to have it, but this is the first time it has seen ink! The top picture is a collage my uncle made depicting different periods in my grandpapa's life and the bottom pic is of the time my daughter met him. She loves music too so she just sat and watched him play piano awestruck.


While we are talking birthdays, I had the pleasure of doing a couple of stamping projects with my little cousin's friends at her 15th b-day party. She wanted one project to be a box that she could put her guests favours in. I decided to do a purse theme since this cousin is a real pink loving girly-girl. And so here is the purse/box in Mellon Mambo and Bermuda Bay. I adapted a template that I found on
this blog. She has tons of fabulous paper purse designs it's definitely worth a look!


For the card I was inspired by the many punch art purse cards out there and the colours in the Sweet Always DSP (retired now). The girls enjoyed putting together the little purses and got really creative making their own designs. One girl added scraps of the Mellon Mambo paper from the big purse to accent her little purses and it looked fabulous!


One more Birthday card then have to go to bed! I was soooooo happy to see this stamp set, Lots of Bots, in the new catalogue. The men in my family tend to be more geeky-techie rather than sporty athletic so I know I will get a lot of use out of this set. (not to mention that my daughter loves robots since watching the film Wall-E). So this was the card I made for my cousin who is turning 17. It's not at all what I had planned on but, when I mounted my new Gallery set which I earned free last month (I love being a demo!) I had to play with it and this is what was born! I used a few recently retired colours and DSP to make the card but, I am totally addicted to kiwi kiss and how it looks with pacific point....I don't know how I'm going to give it up!! The little embellishment on the greeting was made with coated telephone wire that I got years ago from a great little recycling shop in town. It's fun stuff if you can get your hands on it and comes in every colour combo imaginable!


Well that was an über long post, apparently I felt babbly after my long absence! Well no technical glitches so far tonight (cross fingers, knock on wood and all that stuff!) so hopefully, that mean y'all will get to read this! Hope you enjoyed, more to come as always!!


Happy Stampin'!

Tuesday, June 30, 2009

Quick bunch of cards with info to follow...

I have been really busy lately making cards and gifts but have not had a chance to post them. And it looks like my son is going to be an early teether like his sister was (first tooth at 3 mos!) he's been pretty cranky lately because he seems to be working on cutting a canine....as a nursing mommy I have to say I'm not too keen on his choice of first teeth!! Since it doesn't look like things are going to let up any time soon I figured I should at least share a little eye-candy with you and hopefully I can fill in the details later. Enjoy!

This first card was made for a little cousin's 10th b-day, I LOVE making kids cards, their so much fun!!
This is the card I made for my Aunt and Uncle's 60th b-day. They both love the sea and go there every summer so their kids threw them a beach themed party.

This is the father's day card I made for my owl-loving husband, it's actually a big card at 8.5x5.5in.
My husband really wanted his own copy of this photo for work so I thought I would scrap it up a bit for him. This card was made using some of my daughters art, of course I could not convince her to use any other color than purple so I had to get creative with the colour scheme to make it more masculine. This card I made for my Papa, I know it's an odd combitnation but, we always had daxies (wiener dogs) growing up and my dad has really gotten into wine making lately! Cards don't always have to make sense do they? I guess I was in a bit of an odd mood making this one for my father inlaw...I just had to use that adorable raccoon!! And finally...the reason I so desperately need a door on my craft room.... Apparently rolls of ribbon are far too tempting to a three year old!!! I was just glad to have recently removed my retiring ribbons from the bar!
Happy Stampin'!